Developer Guide for Zer0Note
Table Of Contents
1. Introduction
1.1. Welcome!
1.2. How to use this document
2. Setting up
2.1. Prerequisites
2.2. Setting up the project in your computer
2.3. Verifying the setup
2.4. Configure coding style
3. Design
3.1. Architecture
3.2. UI Component
3.3. Commands Component
3.4. Tasks Component
3.5. Notebooks Component
3.6. Storage Component
4. Implementation
4.1. Mode Switch Feature
4.2. Timetable Mode
4.2.1. Tasklist Management Feature
4.2.2. Mark as done Feature
4.2.3. Tag Feature
4.2.4. List Feature
4.2.5. Search Feature
4.3. Notebook Mode
4.3.1. Notebook Management Feature
4.3.2. Select Feature
4.3.3. Tag Feature
4.3.4. Search Feature
4.4. Storage
4.4.1. Storage Format
4.4.2. Implementation
4.5. Error handling
4.6. Personalised Messages
4.7. (Proposed) Save feature for the tagging function
5. Documentation
5.1. Setting up and maintaining the project website
5.2. Style guidance
5.3. Diagrams
5.4. Converting a document to the PDF Format
6. Testing
6.1. Running tests
6.2. Types of tests
Appendix A: Project Scope
Appendix B: User Stores
Appendix C: Use Cases
Appendix D: Non-Functional Requirements
Appendix E: Glossary
Appendix F: Instructions for manual testing
1. Introduction
1.1. Welcome!
Welcome, and thank you for choosing to help contribute to Zer0Note! Zer0Note is a command-line based note-taking and organisation application. It is designed to combine the features of graphical tools like OneNote and Notion, with the editing speed of applications like vim and emacs.
This document is for developers intending to improve Zer0Note, by fixing bugs, or perhaps adding entirely new features. It explains how the project is set up, the architecture used, and the code style you should adopt when contributing code to the project.
1.2. How to use this document
1.2.1. Keywords
Text that looks like this denotes a keyword or small extract of code.
Example: The CliUserInterface is used to handle input and output to and from the console.
1.2.2. Code blocks
Text that looks like this denotes a larger extract of code.
Example:
System.out.println("This is a code block!");
1.2.3. UI elements
Text that looks like this denotes a button, or other UI element you may see on screen.
Example: Click Configure > Project Defaults > Project Structure
1.2.4. Tips
Text that looks like this indicates a tip, providing additional information that is useful but not critically important
Example:
We use this method because Chrome’s built-in PDF viewer preserves hyperlinks.
1.2.5. Important information
Text that looks like this, beginning with the
Example:
2. Setting up
The following section describes how to set up the coding environment on your own computer, in order to start writing code to improve Zer0Note.
2.1. Prerequisites
- JDK 11
- IntelliJ IDEA
2.2. Setting up the project in your computer
- Fork this repo, and clone the fork into your computer.
- Open IntelliJ (if you are not in the welcome screen, click
File>Close Projectto close the existing project dialog first). - Set up the correct JDK version for Gradle
a. ClickConfigure>Project Defaults>Project Structure
b. ClickNew...and find the directory of the JDK. - Click
Import Project. - Locate the
build.gradlefile and select it. ClickOK. - Click
Open as Project. - Click
OKto accept the default settings.
2.3. Verifying the setup
- Run the
teetwelvedashthree.zeronote.Duke. - Try a few commands.
- Run the tests to ensure they all pass.
2.4. Configure the coding style
If using IDEA, follow the guide [se-edu/guides] IDEA: Configuring the code style to set up IDEA’s coding style to match ours.
Optionally, you can follow the guide [se-edu/guides] Using Checkstyle to find how to use the CheckStyle within IDEA e.g., to report problems as you write code.
3. Design
The following section describes the design and implementation of the product. We use UML diagrams and code snippets to explain some aspects of the code. If you are unfamiliar with UML, the diagrams should still be fairly understandable. However, you may wish to consult [CS2113/T] Modeling for a quick introduction to UML.
3.1 Architecture
How the architecture components interact with each other
The following diagram provides a rough overview of how Zer0Note is built.

Figure [1]. Architecture of the application
The CliUserInterface (see here) is the “highest” layer of the application, in
the sense that it interacts directly with the user, and it passes along the input to other classes. The
CliUserInterface contains the state of the application, stored in an instance of AppState. It then uses the other
classes such as InputParser and the various CliCommand classes to execute the instructions provided by the user
. This is explained in more detail in the following sections.
3.2 UI Component
The user interface of Zer0Note is provided by the class CliUserInterface. It is instantiated once in the main
method, and its run() method is called to start the UI for the application.
The CliUserInterface class contains an instance of AppState. This class, as the name implies, contains
the current state of the running instance of the application. For example, it contains the user data, the current mode,
the navigation state (i.e. currently chosen notebook/section/page).
The process below describes the operation of the run() method in CliUserInterface:
- The method
loadState()is called, which loads the save file, and populates theAppStateobject with the previously saved user data. - The
startUI()method is called to display the welcome message to the user. - The
CliUserInterfaceclass then continuously gets the input from the user. It then uses theInputParserclass to parse this input and creates a newCliCommandobject based on the command entered by the user. It executes the command withCliCommand.execute()(learn more here), which will use or modify theAppStateinstance to make the requested change. - If any of these steps encounters an error, an exception of the type
ZeroNoteExceptionis thrown by the method, and caught in therun()method. Upon catching an exception, theprintErrorMessage()method is called to display the appropriate error message to the user. See here for more information on how exceptions work in Zer0Note.
3.3. Commands Component
Every command that a user can input into Zer0Note is represented by an object that extends the abstract class
CliCommand. CliCommand contains some basic fields and methods that are shared by all types of commands, such as:
-
execute(), which is called after setting up the object appropriately, to perform the action requested by the user; -
appState, which refers to theAppStateobject that stores the state of the currently running instance of Zer0Note; and -
commandParams, which is a String containing the parameters the user entered as parameters to the command.
The following 2 UML diagrams show the different types of CliCommand components used in the application.
This diagram describes the CliCommands related to the Timetable mode.
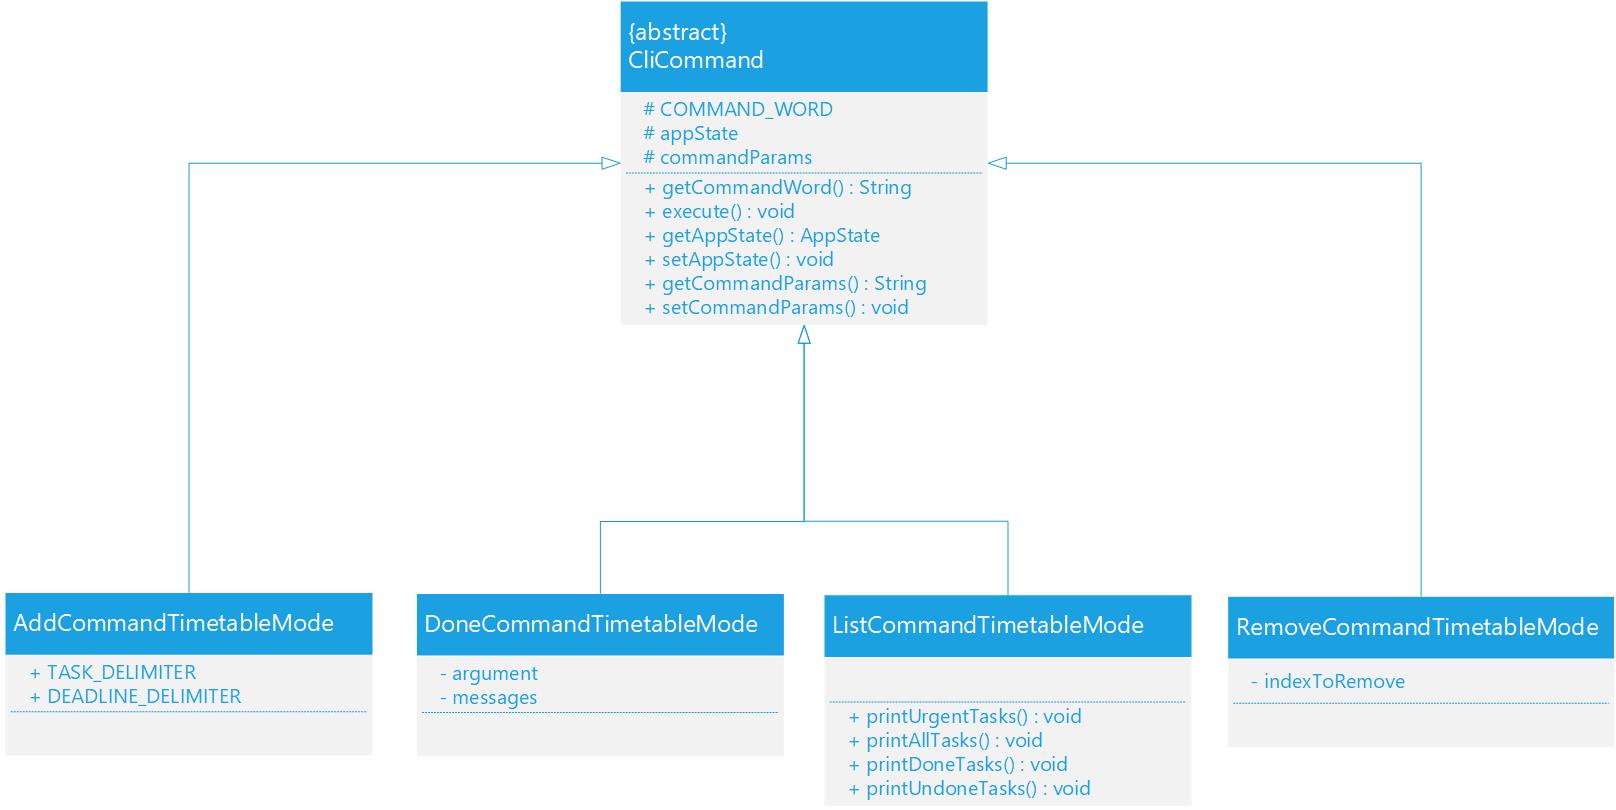 Figure [2]. Class diagram for Timetable commands
This diagram describes the CliCommands related to the Notebook mode.
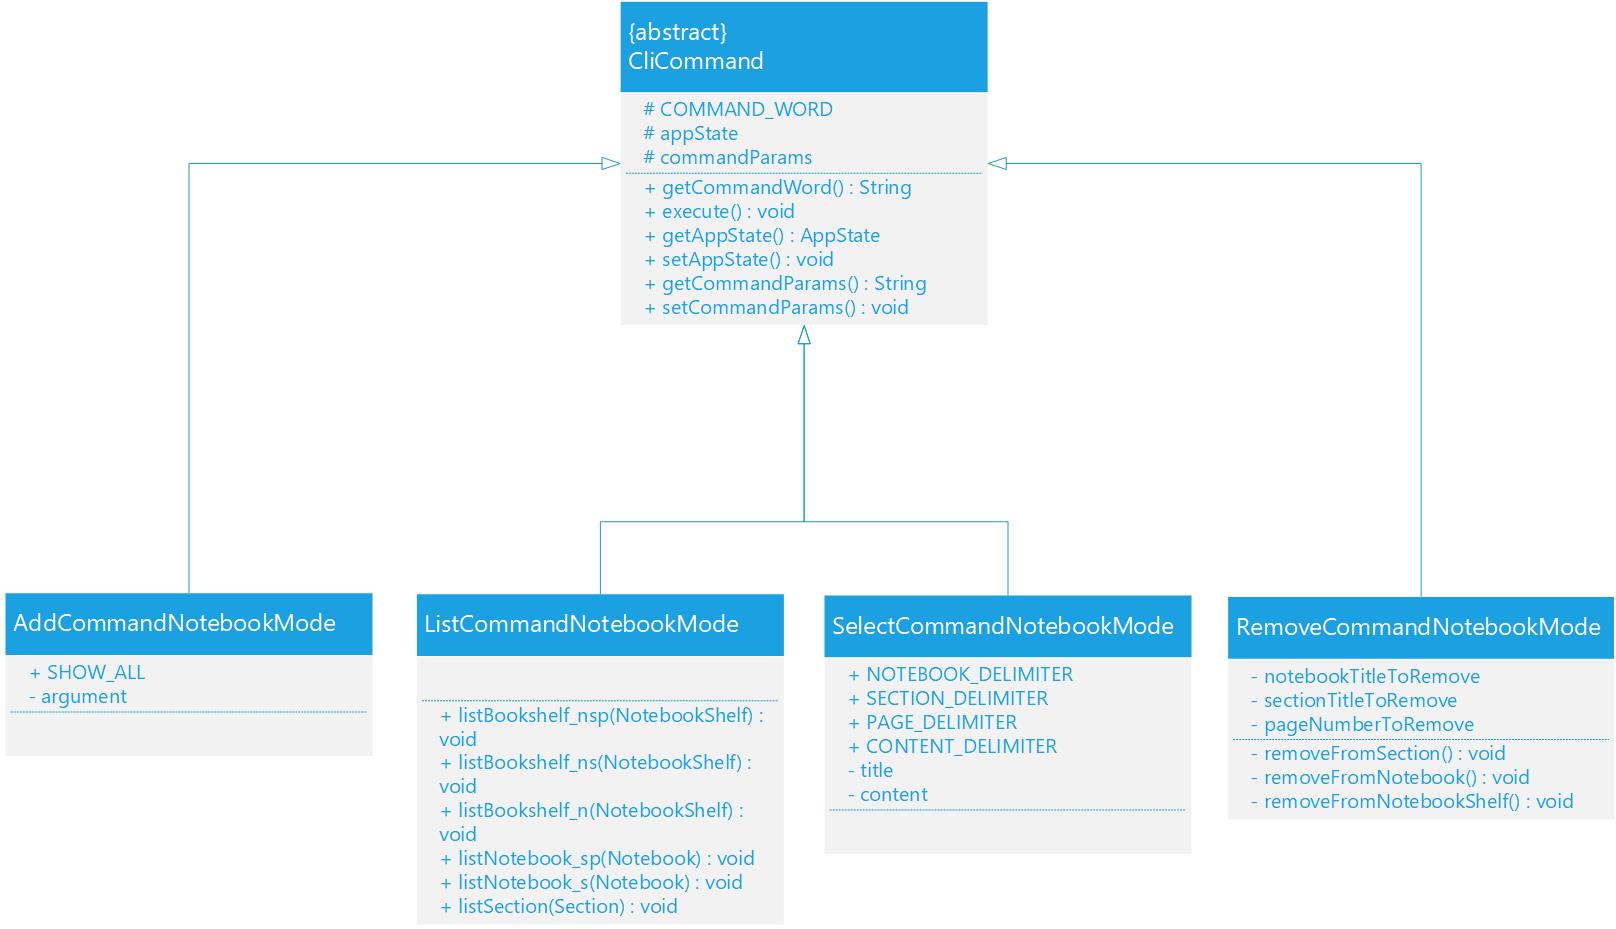 Figure [3]. Class diagram for Notebook commands
3.4. Tasks Component
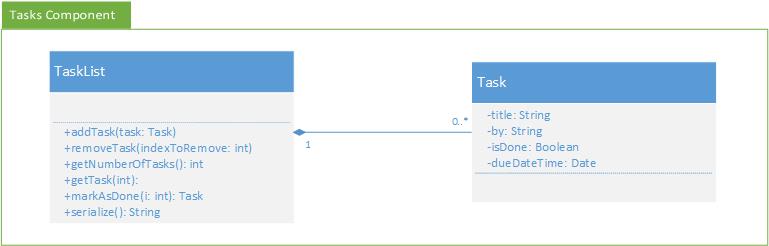
Figure [4]. Class diagram for the Task component
The Tasks component,
- stores an array of
Taskobjects that represents the deadline of the user. - together with the
Notebookscomponent form theAppStatecomponent.
The TaskList class,
- has methods
TaskList#addTask()to add a newTaskobject andTaskList#removeTask()to remove an existing one at an index.
3.5. Notebooks Component
 Figure [5]. Class diagram for the Notebooks component
The Notebooks class,
- stores a
NotebookShelfobject that contains a list ofNotebookobjects. - together with the
Taskscomponent form theAppStatecomponent.
The NotebookShelf class,
- has methods
NotebookShelf#addNotebook()to add newNotebookobject andNotebookShelf#removeNotebook()remove an existing one. - has methods
NotebookShelf#findNotebook()to search through to find aNotebookobject with matching titles.
The Notebook class,
- contains a title and a list of
Sectionobjects. - has methods
Notebook#addSection()to add a newSectionandNotebook#removeSection()to remove an existing one. - has a
tagfield that user can be set and get.
The Section object,
- contains a title and list of
Pageobjects. - has methods
Section#addPage()to add a newPageobject andSection#removePage()to remove an existing one. - has a
tagfield that user can be set and get.
The Page object,
- contains a title, and the content of the page as a String object.
- has a
tagfield that user can be set and get.
3.6. Storage Component
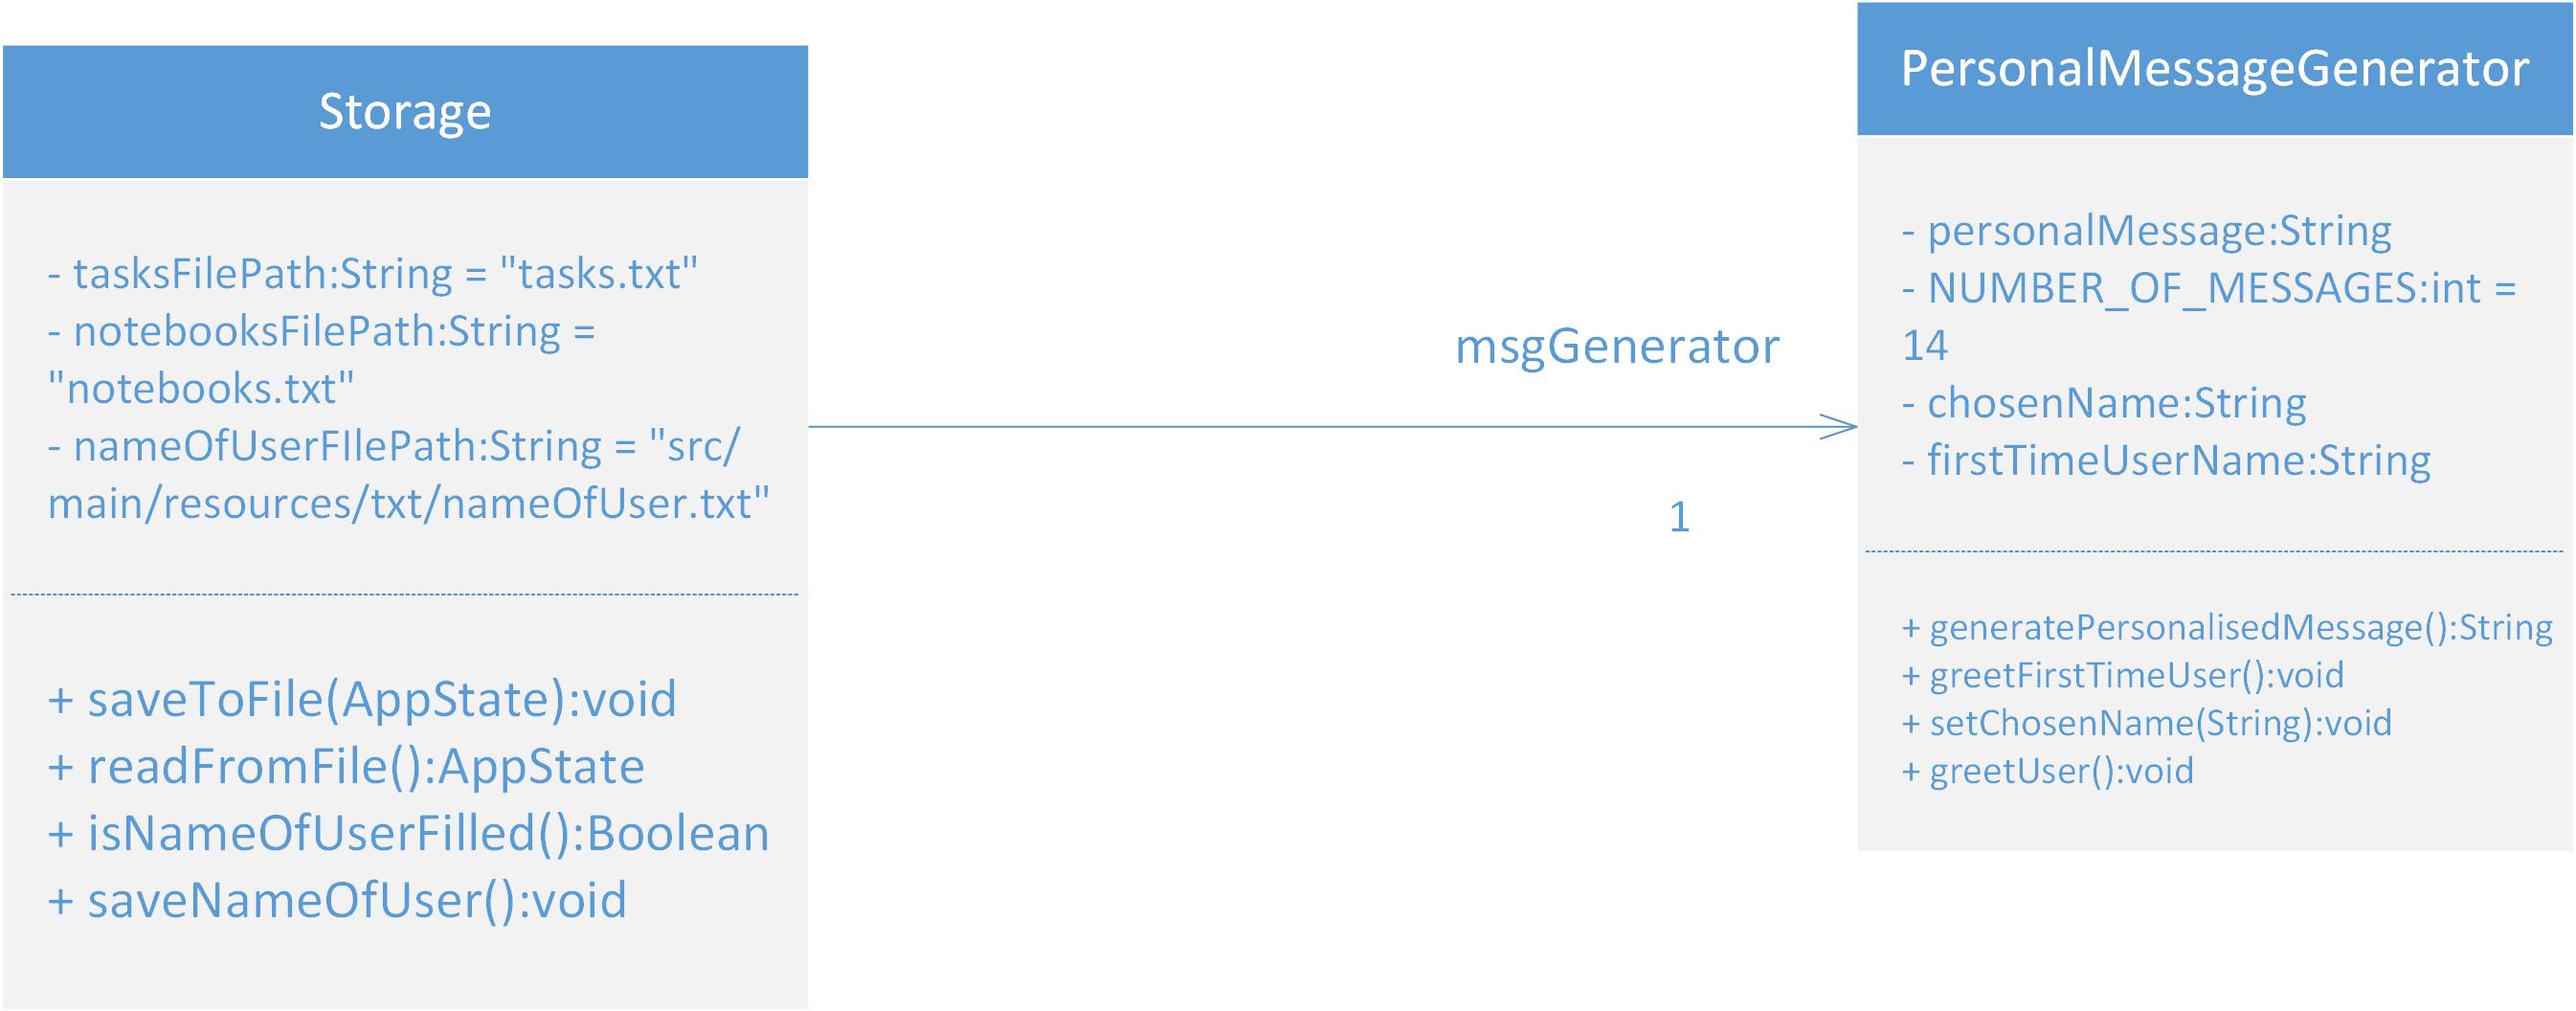 Figure [6]. Class diagram for the Storage component
The Storage component,
-
Stores user’s inputs into .txt files, which are all found under the same directory as the JAR file.
-
Contains the method
saveToFileto save the current AppState of the application in thenotebooks.txtandtasks.txtfiles. -
Contains the method
readFromFileto load up data containing the input of the user’s previous session on Zer0Note. -
Saves the name of the user in a
nameOfUser.txtand reads it back in the form of personalised messages.
4. Implementation
The following section describes the implementation of certain key features in the current version of Zer0Note. It also provides some background into our (the original developers of Zer0Note) thinking and the rationale behind the decisions.
4.1. Mode Switch Feature
4.1.1. Implementation
The mode switch mechanism is facilitated by AppState. It contains an AppMode object and can be accessed from
Mode Switch object. The AppMode is an enum which have five possible values: TIMETABLE, NOTEBOOK_SHELF
, NOTEBOOK_BOOK,
NOTEBOOK_SECTION, NOTEBOOK_PAGE. Users can only use the mode command to switch to either TIMETABLE or NOTEBOOK_SHELF
modes. The rest of the modes are used by developers when implementing the select command.
The following sequence diagram shows how the mode switch operation works:
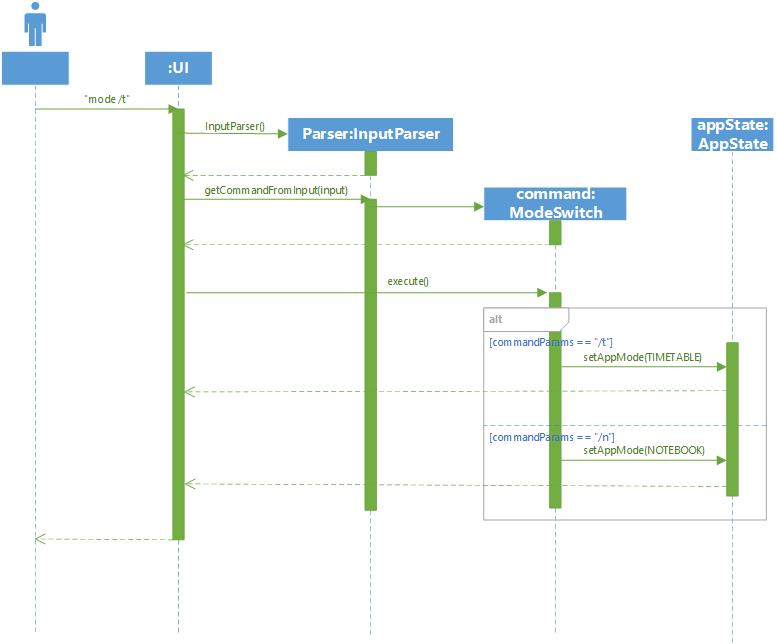 Figure [7]. Sequence diagram for the Mode Switch Command
Given below is an example usage scenario and how the find mode switch function behaves.
Step 1. The user launches the application for the first time. The AppState object is constructed and the AppMode
field is set to TIMETABLE by default.
Step 2. The user types mode /n. The mode /t command is passed through
InputParser#getCommandFromInput, which constructs a ModeSwitch object and calls ModeSwitch#execute().
Step 3. execute() is called, which then set the AppMode field in the AppState object either to TIMETABLE
or NOTEBOOK_SHELF or throw an InvalidCommandException.
Step 4. To signal that the user has successfully changed the mode, a message is printed with the current mode of the program.
4.2. Timetable Mode
4.2.1. TaskList Management Feature
Implementation
TaskList is implemented to manage and store the tasks input by the user. It comprises an ArrayList list of
Tasks, and a few helper methods.
This means that multiple operations such as addition and deletion can be done on a Task, without affecting
the contents of other Task in the TaskList.
Given below is an example usage scenario and how the Add task function behaves.
-
The user launches the application for the first time. CliUserInterface#executeCommand is called when the user adds a
Taskinto theTaskList. -
The user types
add /tTask /by19-10-2020 1900. Theaddcommand is passed throughInputParser#getCommandFromInput, which then creates a constructor forAddCommandTimetableMode. -
AddCommandTimetableMode#execute()is called, which then callsInputParser#parseTaskTitle, which first extracts thetitlefrom the user’s input. -
InputParser#parseDeadlineis then called, which returns thedeadlinetoAddCommandTimetableMode#execute(). -
TaskList#addTaskis then called and a newTask, withtitleanddeadline, is initialised. -
To signal that the user has successfully added a task, a message is printed with
CliMessages#printAddedTaskMessage.
The UML sequence diagram below shows how the add task command works.
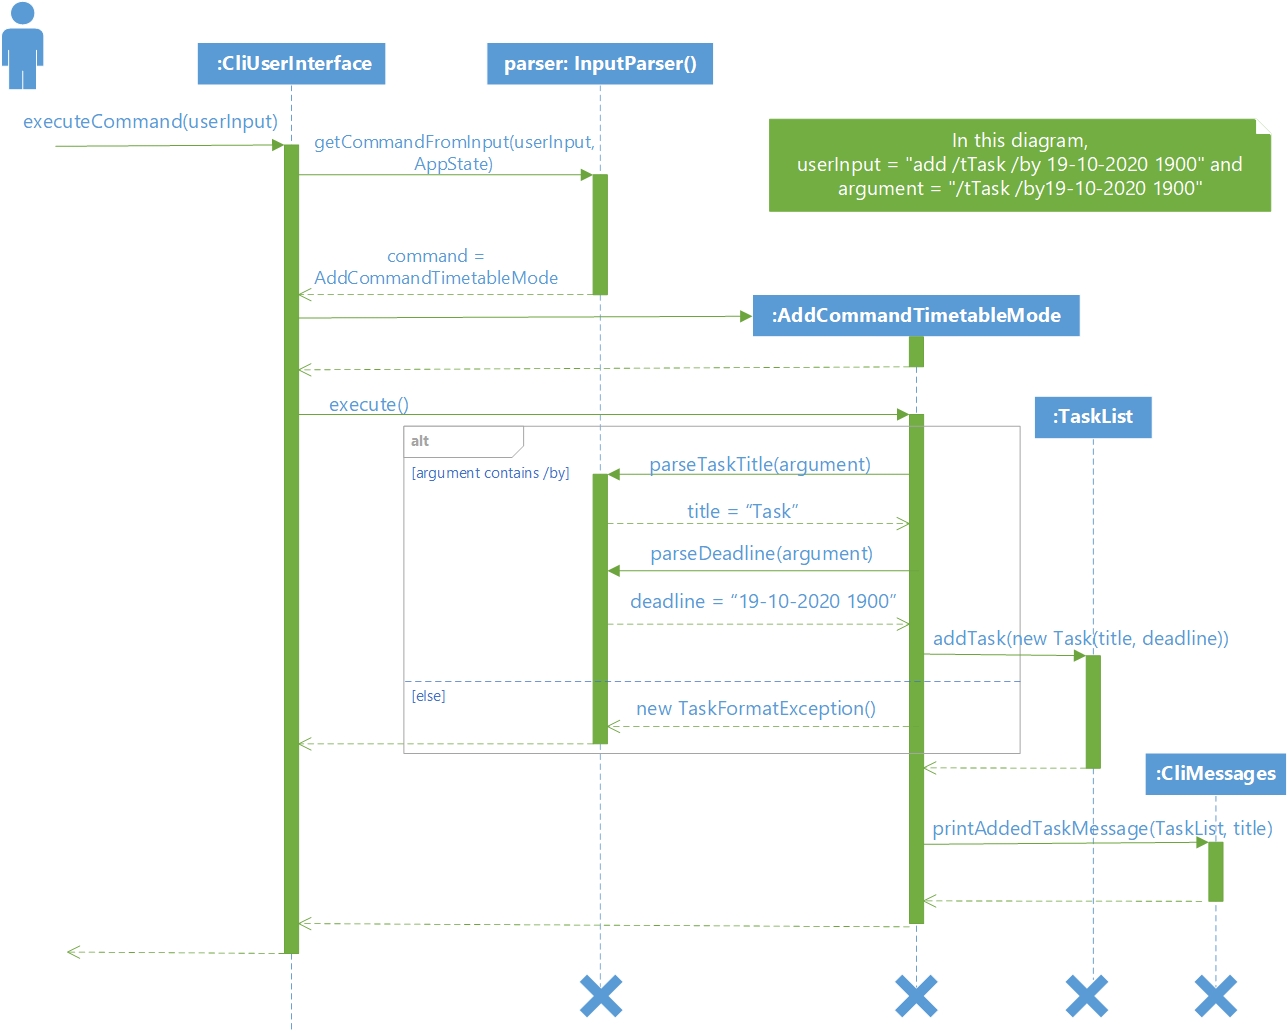 Figure [8]. Sequence diagram for the Add Task Command
TaskList also allows the deletion of tasks by the user.
The figure below shows how the delete task command works:
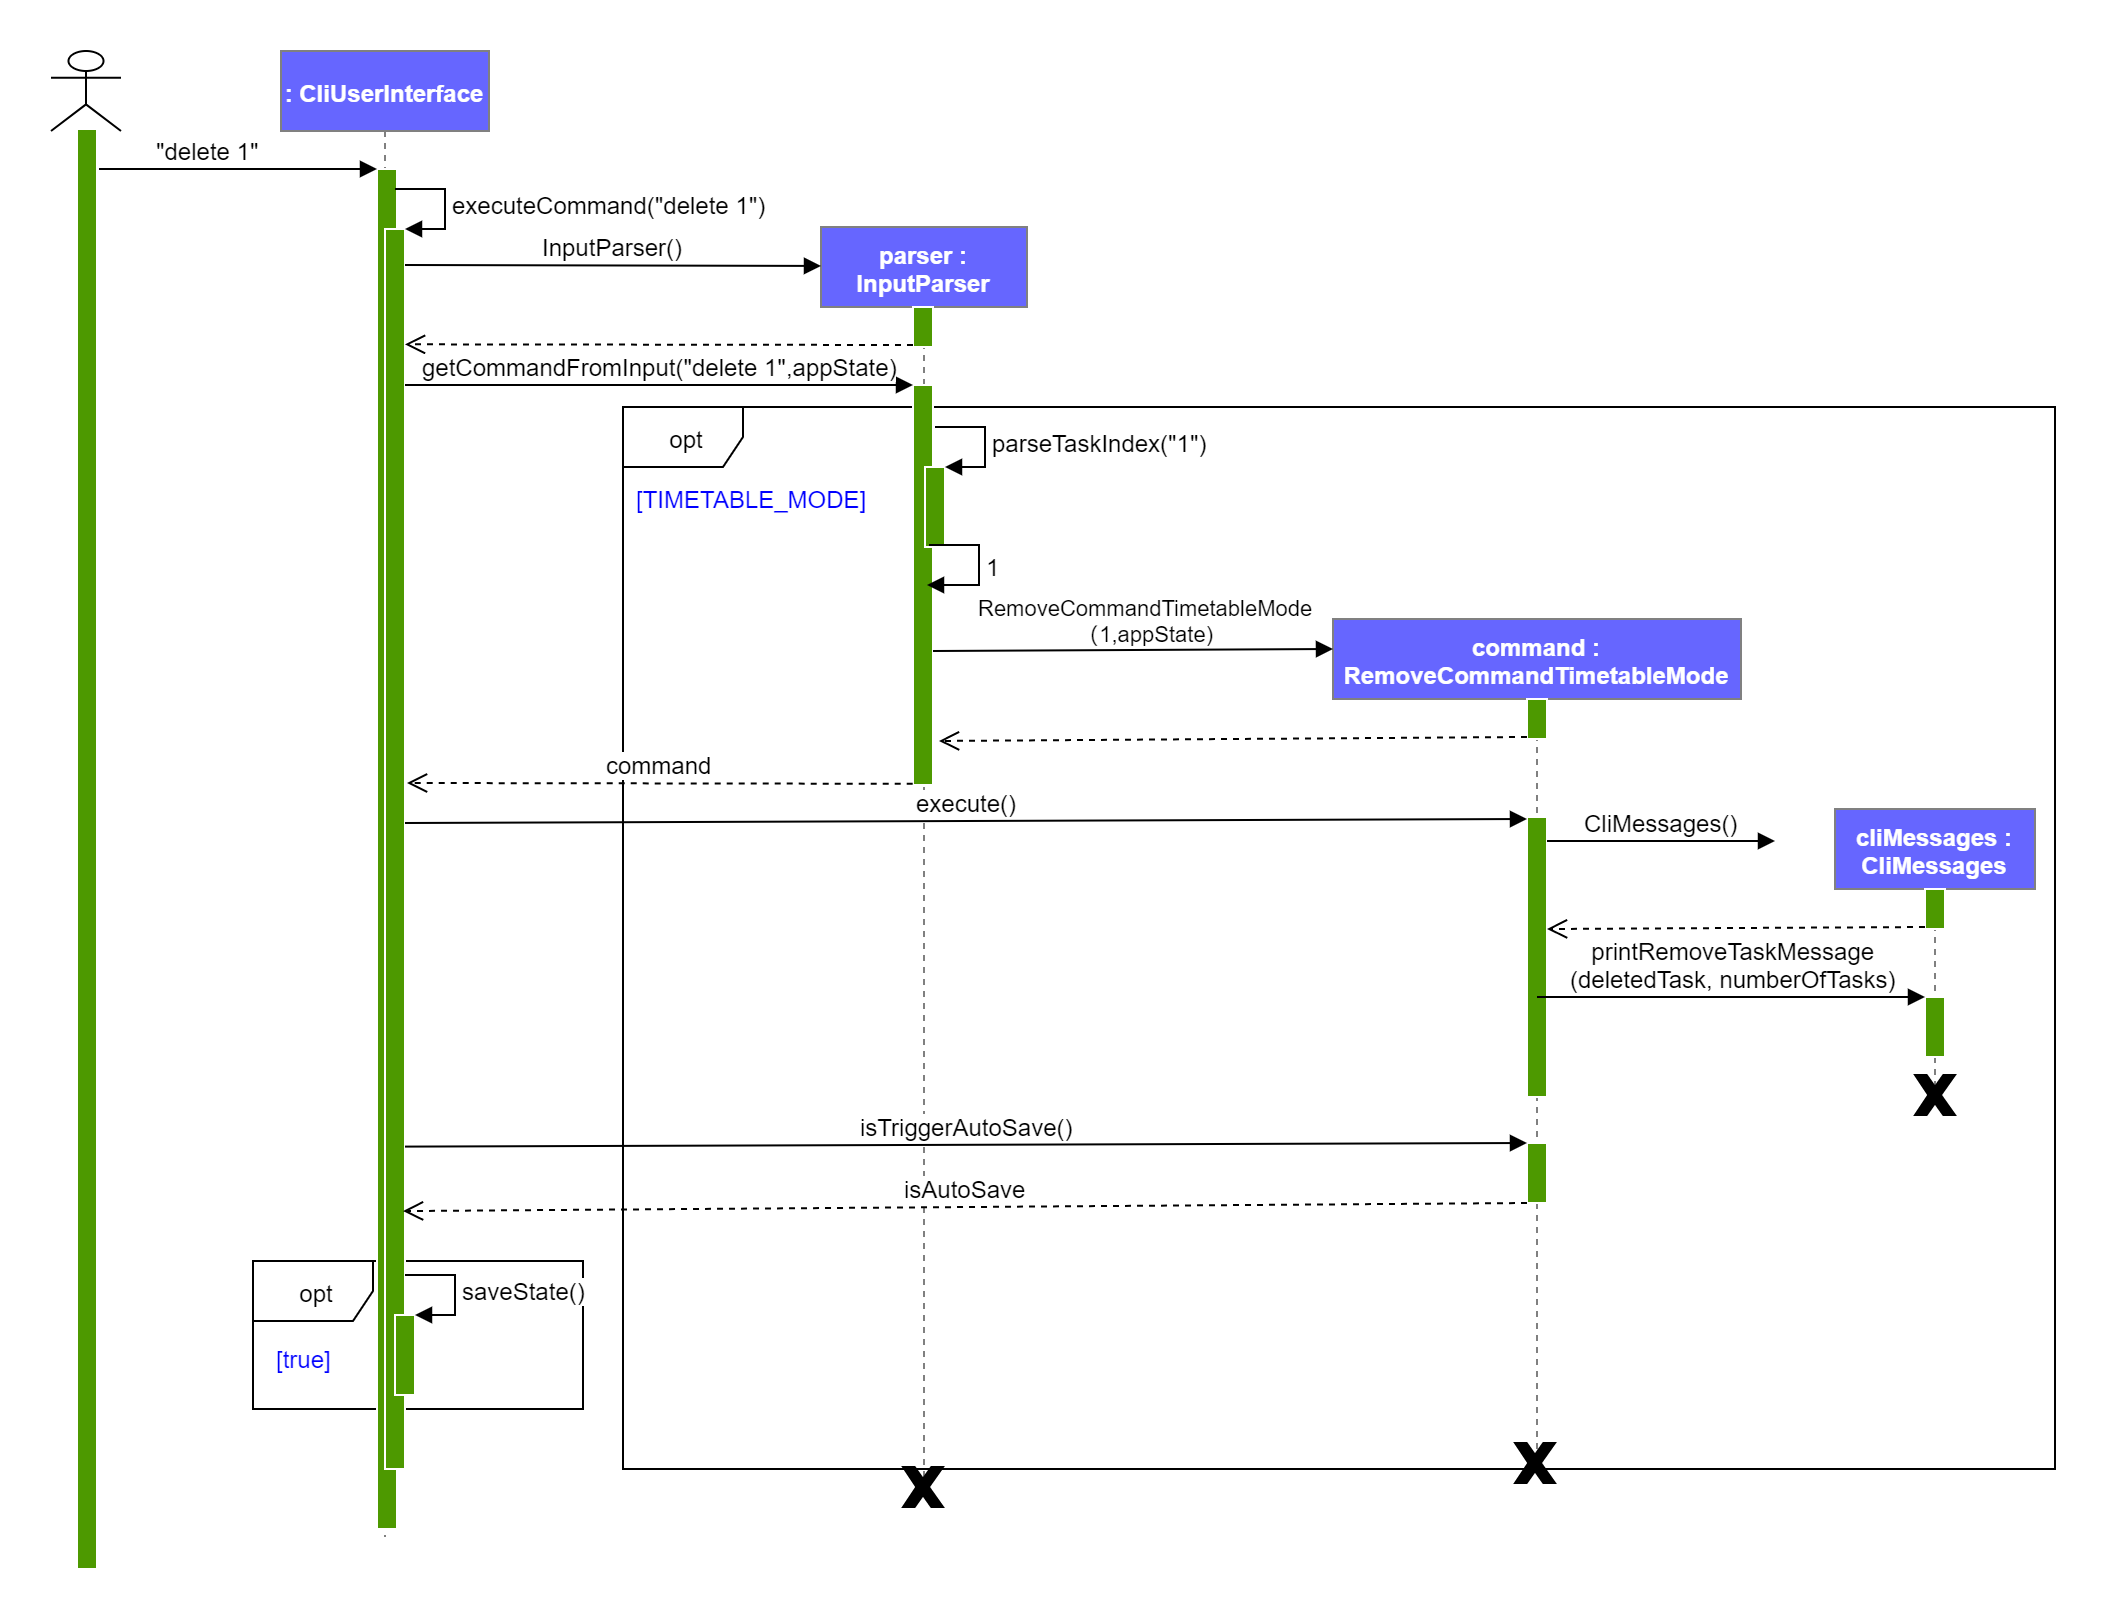 Figure [9]. Sequence diagram for the Delete Task Command
Here are the general steps that the command goes through when the user inputs “delete 1”:
- The
CliUserInterfacereceives the “delete 1” input by the user and passes it to theInputParserclass. -
InputParserparses the input to determine the type of command, and the index of the task that is required to delete. -
InputParserconstructs aRemoveCommandTimetableModeand passes the index number to the class. -
RemoveCommandTimetableMode#execute()is called to delete the task. - If the task is deleted,
RemoveCommandTimetableMode#execute()also callsCliMessages#printRemoveTaskMessageto display the success message to the user. -
CliUserInterface#IsTriggerAutosaveis called to verify whether a change has been made in the TaskList or NotebookShelf.
Design Considerations
Aspect: How to store tasks in TaskList
-
Alternative 1 (current choice): Store as an
ArrayListof tasks- Pros: It is easier to implement because the code base are list based.
- Cons: Searching in an ArrayList will take O(n) time as every index must be checked.
-
Alternative 2: Store as a Hash Table with the key as the index and value as
Task- Pros: Searching for a task with a given title in a HashTable is faster, and O(1) time can be achieved.
- Cons: It takes more resources to implement. The constant factor for a hashing algorithm is significant and not worth the tradeoff for smaller amounts of data, like a typical user would be likely to generate.
4.2.2. Mark as done feature
Implementation
The Task class contains a member isDone of Boolean type.
The following sequence diagram shows how the mark as done operation works:
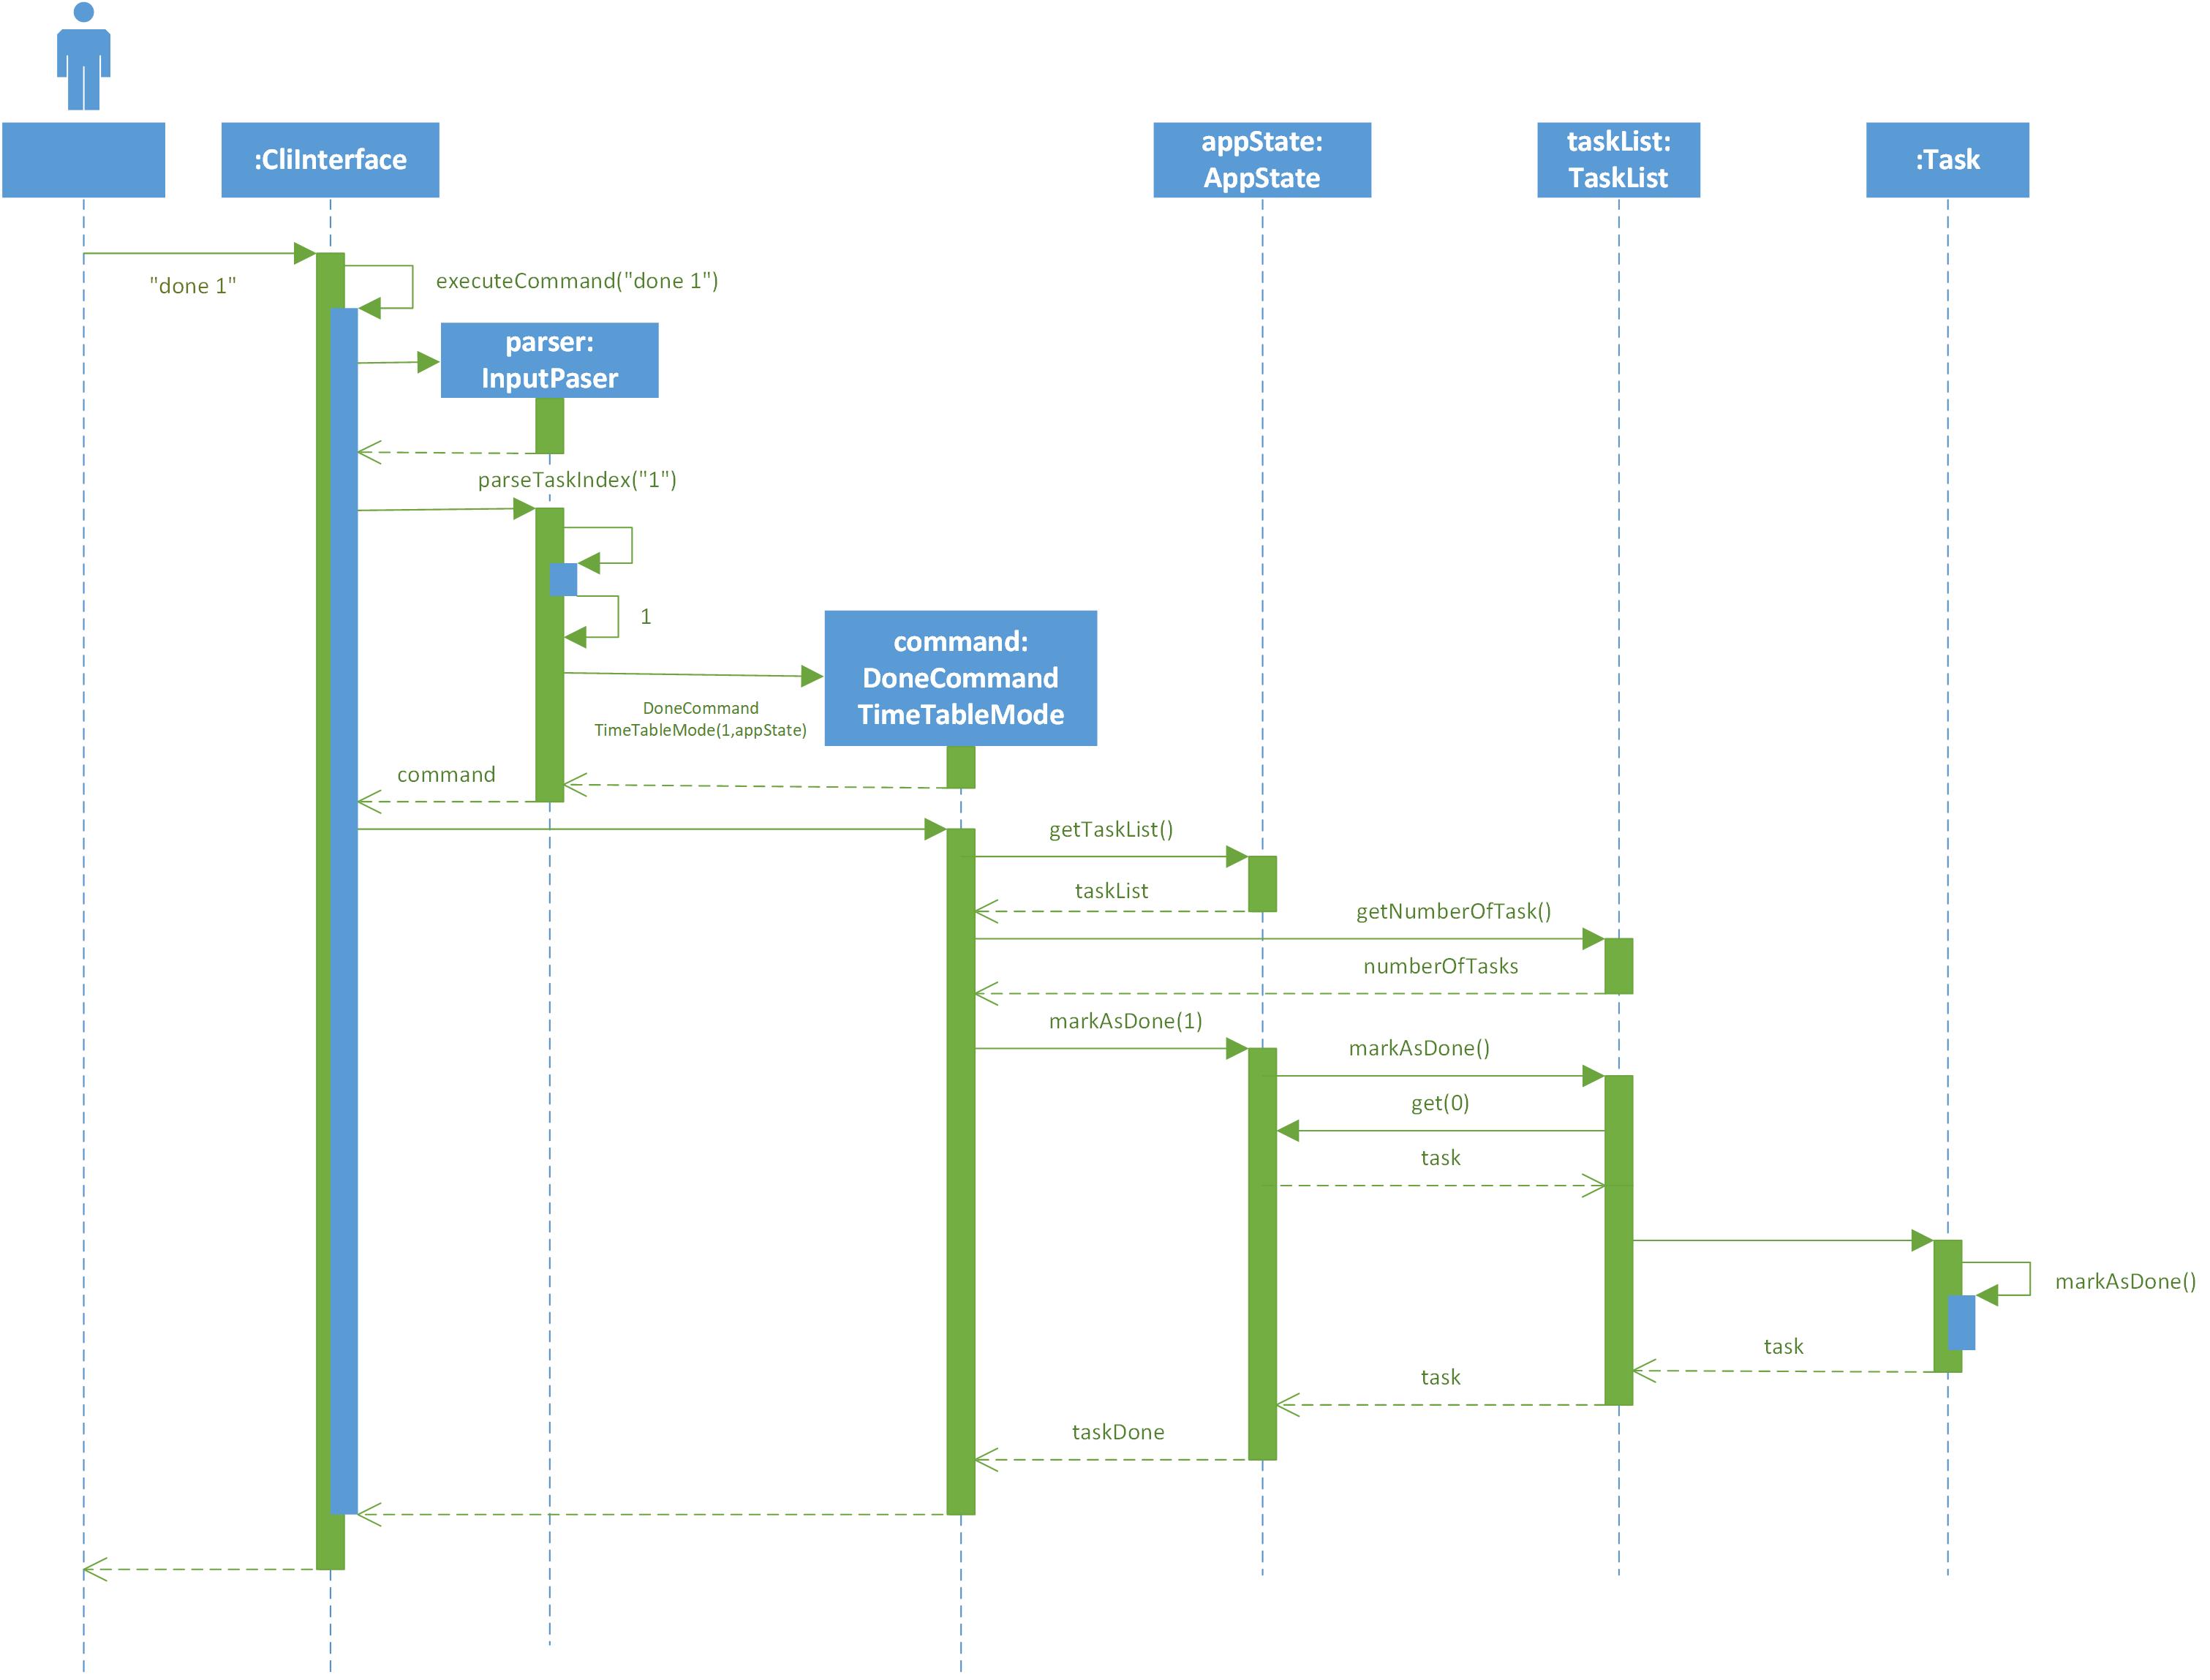
Figure [10]. Sequence diagram for Mark as Done Command
The following is an example of the processes that occur when the user uses the mark as done function:
-
The user types
done 1. Thedone 1command is passed throughInputParser#getCommandFromInput, which constructs a DoneCommandTimetableMode object and callsDoneCommandTimetable#execute(). -
execute()is called, which then initialises a variabletaskListof type TaskList. The method then callsAppState#getTaskList, which returns all existing tasks in the current tasklist. -
The
execute()method proceeds to parse the user’s intended task index to be marked as done throughInteger.parseInt(). Using this index, it initialises a variabletaskDoneof type task and callsAppState#markAsDone(index). -
Appstate#markAsDone(index)calls theisDone()method in task, which changes the isDone variable in the specific task to be true. -
After
taskDoneis initialised, aCliMessagesobject of namemessagescalls a methodprintMarkDone(taskDone)with the variabletaskDoneas the argument, which in turn prints a success message with the respective task to the user.
4.2.3. Tag Feature
The user can tag Tasks in the TaskList. This section describes the implementation and design considerations for this
feature.
Implementation
The Task class contains a member tag of String type.
The figure below shows how the tag operation works:

Figure [11]. Sequence diagram for Tag Timetable Command
There are the general steps during the tag operation. When the user enters tag 1 /tCS2113T into the command window
while using the application:
- The
CliUserInterfacereceives the “tag 1 /tCS2113T” input by the user and passes it to theInputParserclass. -
InputParser#getCommandFromInputparses the input to get the task index number and the tag description -
InputParser#getCommandFromInputthen constructs theTagCommandTimetableModeclass and returns it toCliUserInterface. -
TagCommandTimetableMode#execute()is called to tag the task. - If the tag is added successfully,
TagCommandTimetableMode#execute()callsCliMessages#printTagTaskMessageto display the success message to the user. -
CliUserInterface#IsTriggerAutosaveis called to verify whether a change has been made in the TaskList or NotebookShelf.
Design Considerations This section describes some considerations involved when designing the tag feature.
Aspect: How to store the tags
-
Alternative 1 (current choice): Store as a private
Stringmember in every task- Pros: It is easy to access for print operations.
- Cons: It is unoptimized in terms of complexity for search operations, which requires more work for scaling of the application.
-
Alternative 2: Store as a Hash Table with the key as the tag and value as
Task- Pros: It has a better time complexity for search operations since this data structure is more optimized (O(1) can be achieved).
- Cons: Takes up storage space
4.2.4. List Feature
Implementation
The following sequence diagram shows how the list operation works:
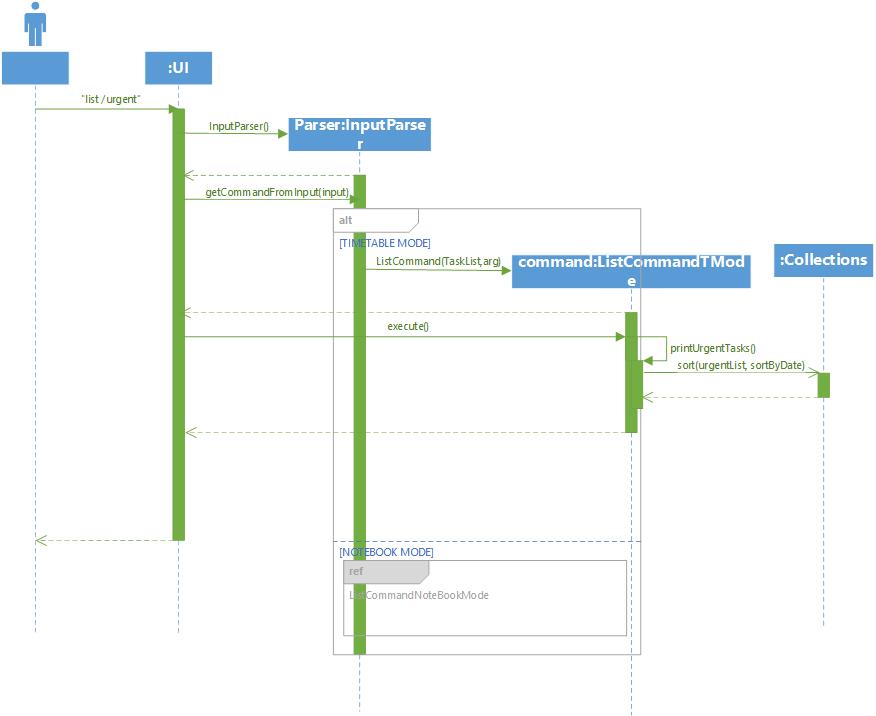
Figure [12]. Sequence diagram for List Command in Timetable Mode
Given below is an example usage scenario and how the list function behaves.
Step 1. The user types list /urgent. The list /urgent command is passed through
InputParser#getCommandFromInput, which constructs a ListCommandTimetableMode object and calls
ListCommandTimetableMode#execute().
Step 2. execute() is called, which then calls the sort() function of Collections utility class and sort the list
based on the due date of the Task objects in the list.
Step 3. The program prints up to three tasks in the sorted list.
4.2.5. Search Feature
This feature allows the user to search for tasks by keyword or by tag. Refer to Tag Feature for more information on the implementation of tags.
This section explains the implementation and design considerations for the search feature.
Implementation
The class FindCommandTimetableMode executes the search feature. The following sequence diagram shows an example of
how the complete command works:
 Figure [13]. Sequence diagram for Find Command in Timetable Mode
For example, when the user enters find /tCS2113T into the command window while using the application:
- The
CliUserInterfacereceives the “find /tCS2113T” input by the user and passes it to theInputParserclass. -
InputParser#getCommandFromInputparses the input to return an empty keyword and the tag description. -
InputParser#getCommandFromInputthen constructs theFindCommandTimetableModeclass and returns it toCliUserInterface. -
FindCommandTimetableMode#execute()is called to conduct the search. a. If tag is empty,execute()callsgetTasksWithTitleContainingKeyword(tasks), which returns all tasks which contain the keyword in their title. b. If keyword is empty,execute()callsgetTasksWithTag(tasks), which returns all tasks with the tag. - If the tag is added successfully,
TagCommandTimetableMode#execute()displays all found tasks to the user. -
CliUserInterface#IsTriggerAutosaveis called to verify whether a change has been made in the TaskList or NotebookShelf.
Design Considerations
This section describes some considerations involved when designing the find feature.
Aspect: Distinction between finding by keyword and finding by tag
- Alternative 1 (current choice): Handle as an if-else statement in a single class
-
Alternative 2: Two different classes that are subclasses to a class
FindCommandTimetableMode- Pros: Higher level of abstraction
- Cons: Unable to be returned directly by
InputParser#getCommandFromInputas they are not subclasses of theCliCommandclass. An if-else statement is still required inside theFindCommandTimetableMode#executemethod.
4.3. Notebook Mode
4.3.1. Notebook Management Feature
As shown in Figure 1, the NotebookShelf class comprises instances of Notebook class. Notebook comprises Section
and Section comprises Page. The navigability is not bidirectional. Multiple operations such as addition and deletion
can be done without affecting other instances at all, while updating the Notebook it is in.
This section explains the implementation and design considerations for managing Notebooks.
Implementation
There are two main functions in notebook management: add and remove.
Given below is an example usage scenario and how the add notebook function behaves.
-
The user launches the application for the first time.
CliUserInterface#executeCommandis called when the user adds newNotebookinto theNotebookShelf. -
The user types
add /nCS2113T. Theaddcommand is passed throughInputParser#getCommandFromInput. -
InputParser#parseNotebookTitleis then called, and it returns thetitleToAdd, which isCS2113T. -
A constructor for
AddCommandNotebookModeis created. -
AddCommandNotebookMode#execute()runs, which then callsNotebookShelf#addNotebook. -
A new
Notebook, entitledCS2113Tis initialised.
The UML sequence diagram below shows how the add notebook command works.
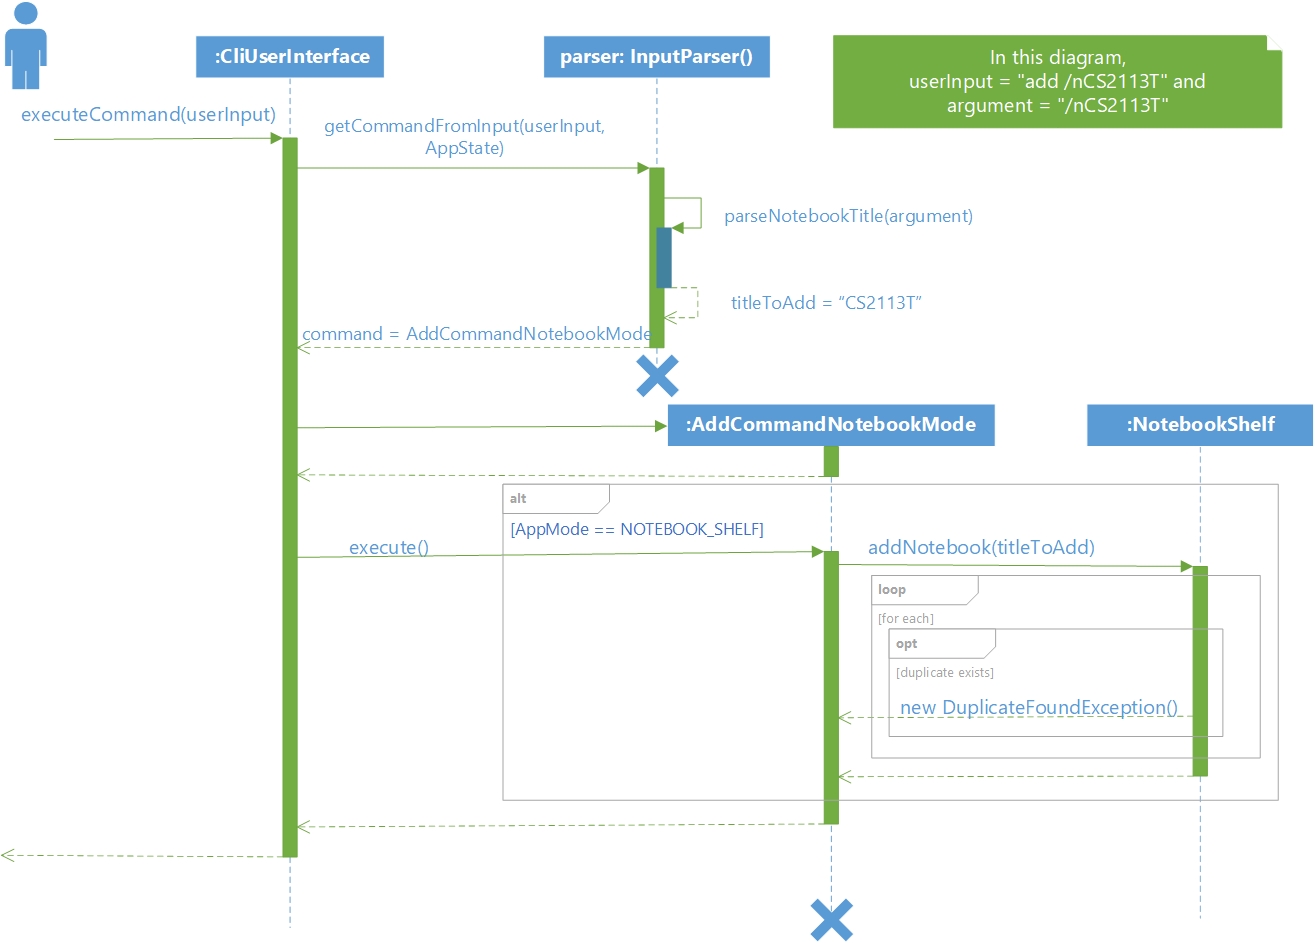 Figure [14]. Sequence diagram for Add Command in Notebook Mode
Notebook Mode also allows the user to remove a notebook/section/page.
The figure below shows how the “delete notebook” command works:
 Figure [15]. Sequence diagram for Delete Command in Notebook Mode
The sequence diagram above depicts an example where the user wants to delete a page:
- The
CliUserInterfacereceives the “delete /nCS2113T /sTP /p11” input by the user and passes it to theInputParserclass. -
InputParser#getCommandFromInputparses the input to return the notebook title “CS2113T”, section title “TP”, and the page title “11”. -
InputParser#getCommandFromInputthen constructs theRemoveCommandNotebookModeclass and returns it toCliUserInterface. -
RemoveCommandNotebookMode#execute()is called to delete the page. a. If the user is in a bookshelf,execute()callsremoveFromNotebookshelf(). b. If the user is in a notebook,execute()callsremoveFromNotebook(Notebook). c. If the user is in a section,execute()callsremoveFromSection(Section). -
CliUserInterface#IsTriggerAutosaveis called to verify whether a change has been made in the NotebookShelf.
4.3.2. Select Feature
The user can select a Notebook, Section or Page to view its contents. This section describes the implementation and design considerations for this feature.
Implementation
Given below is an example usage scenario and how the select notebook function behaves.
-
CliUserInterface#executeCommandis called when the user selects aNotebookfrom theNotebookShelf. -
The user types
select /nCS2113T. Theselectcommand is passed throughInputParser#getCommandFromInput. -
InputParser#getCommandFromInputreturns the commandSelectCommandNotebookMode. -
A constructor for
SelectCommandNotebookModeis created. -
SelectCommandNotebookMode#execute()runs, which then callsInputParser#extractParams. -
If the argument typed by the user contains
/n, which is the Notebook delimiter,InputParser#extractNotebookParamsis called. -
Within
InputParser#extractNotebookParams,AppState#setAppModeis called to set theAppModeasNOTEBOOK_BOOK.
The UML sequence diagram below shows how the select notebook command works.
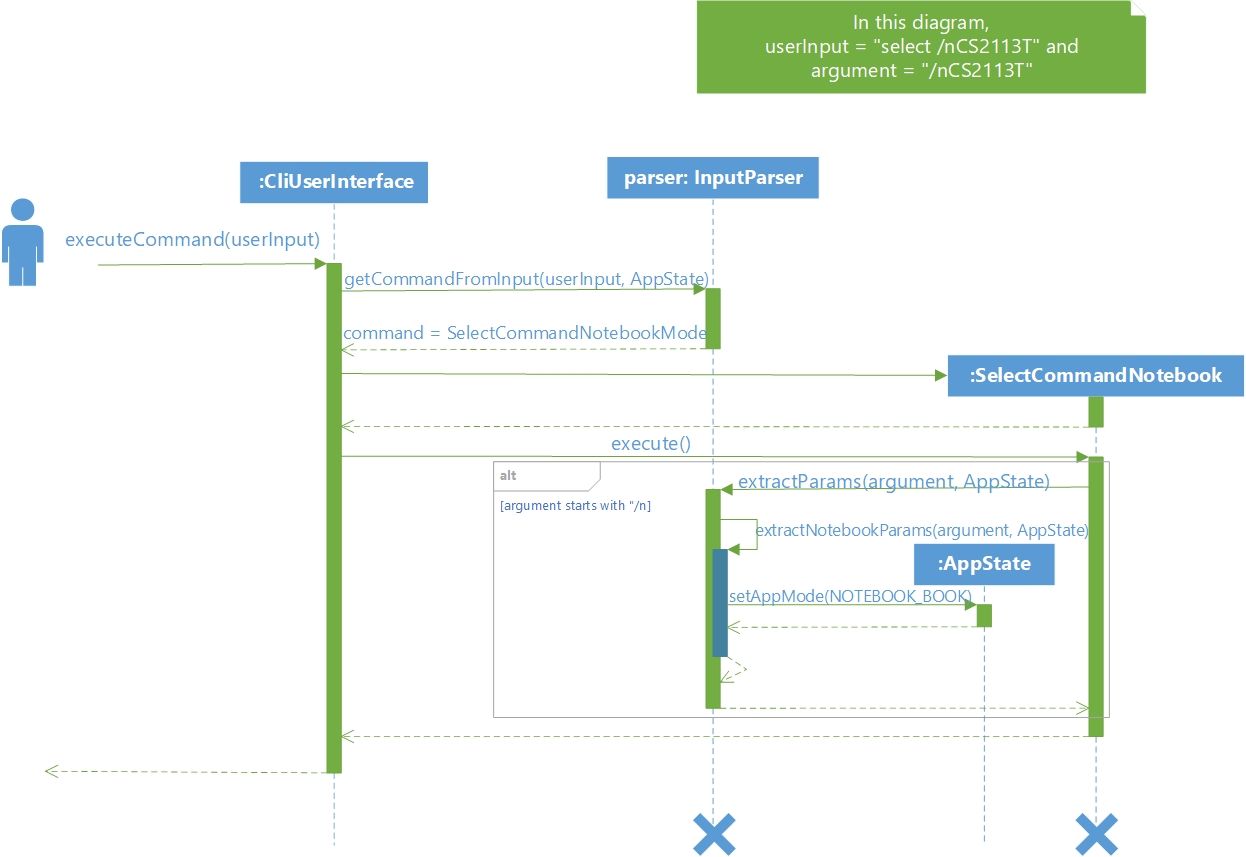 Figure [16]. Sequence diagram for Select Command in Notebook Mode
Design Considerations
Aspect: How much navigability the Select function should have
-
Alternative 1 (current choice): The user must always select the notebook title if he wants to choose a section or page within it.
- Pros: It is easy to catch exceptions when the notebook/section does not exist. This also ensures that even if there are 2 sections in 2 different notebooks with the same name, the user can select the correct section.
- Cons: The format for the command is longer.
-
Alternative 2: The user can select a notebook/section/page wherever he wants.
- Pros: The command the user has to type is much shorter.
- Cons: If the user has notebooks/sections with the same name, he cannot be sure that the item he wants will be selected correctly.
4.3.3. Tag Feature
The user can add a tag to a Notebook, Section or Page. This section describes the implementation and design
considerations for this feature.
Implementation
The Notebook, Section and Page classes each contain a member tag of type String.
The figure below shows how the tag operation works:
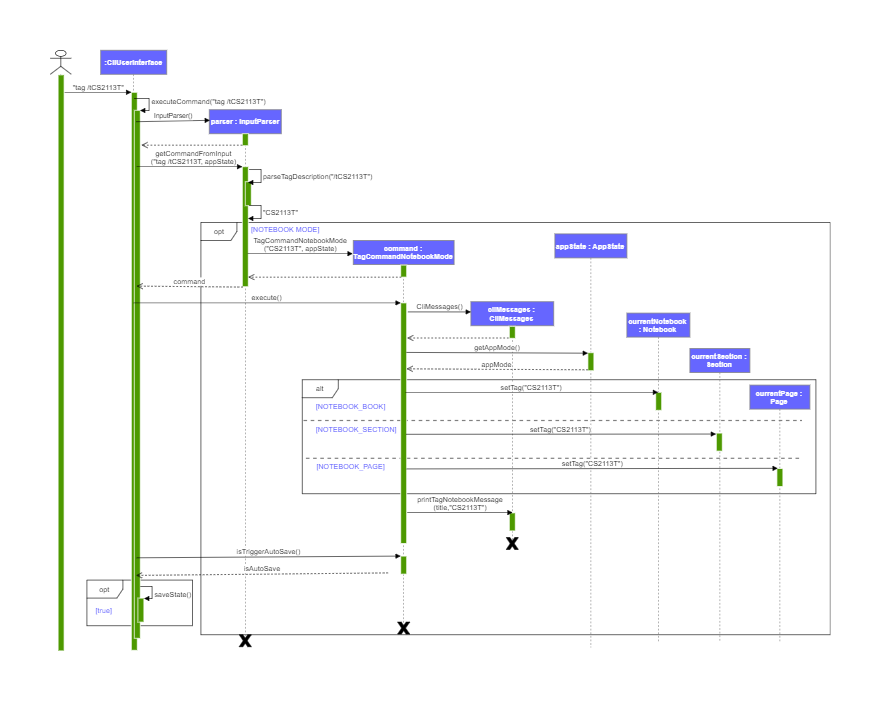 Figure [17]. Sequence diagram for Tag Command in Notebook Mode
When the user enters tag /tCS2113T into the command window while using the application:
- The
CliUserInterfacereceives the “tag /tCS2113T” input by the user and passes it to theInputParserclass. -
CliUserInterface#executeCommand(String argument)callsInputParser#getCommandFromInput. -
InputParser#getCommandFromInputfirst parses the input to return the tag “CS2113T”. -
InputParser#getCommandFromInputthen constructs theTagCommandNotebookModeclass and returns it toCliUserInterface. -
TagCommandNotebookMode#execute()is called to add a tag to the notebook/section/page the user is in. -
CliUserInterface#IsTriggerAutosaveis called to verify whether a change has been made in the NotebookShelf.
Design Considerations This section describes some considerations involved when designing the tag feature.
Aspect: How to store the tags
-
Alternative 1 (current choice): Store as a private
Stringmember in every task- Pros: It is easy to access for print operations.
- Cons: It is unoptimized in terms of complexity for search operations, which requires more work for scaling of the application.
-
Alternative 2: Store as a Hash Table with the key as the tag and value as
Task- Pros: It has a better time complexity for search operations since this data structure is more optimized (O(1) can be achieved).
- Cons: It is hard to retrieve the tag for a specific
Taskdue to the structure of the key-value pair.
4.3.4. Search Feature
This feature works similarly to the search feature in the Timetable mode. Refer to Tag Feature for more information on the implementation of tags in the Notebook mode.
Implementation
The following sequence diagram shows how the search feature works in the notebook mode:
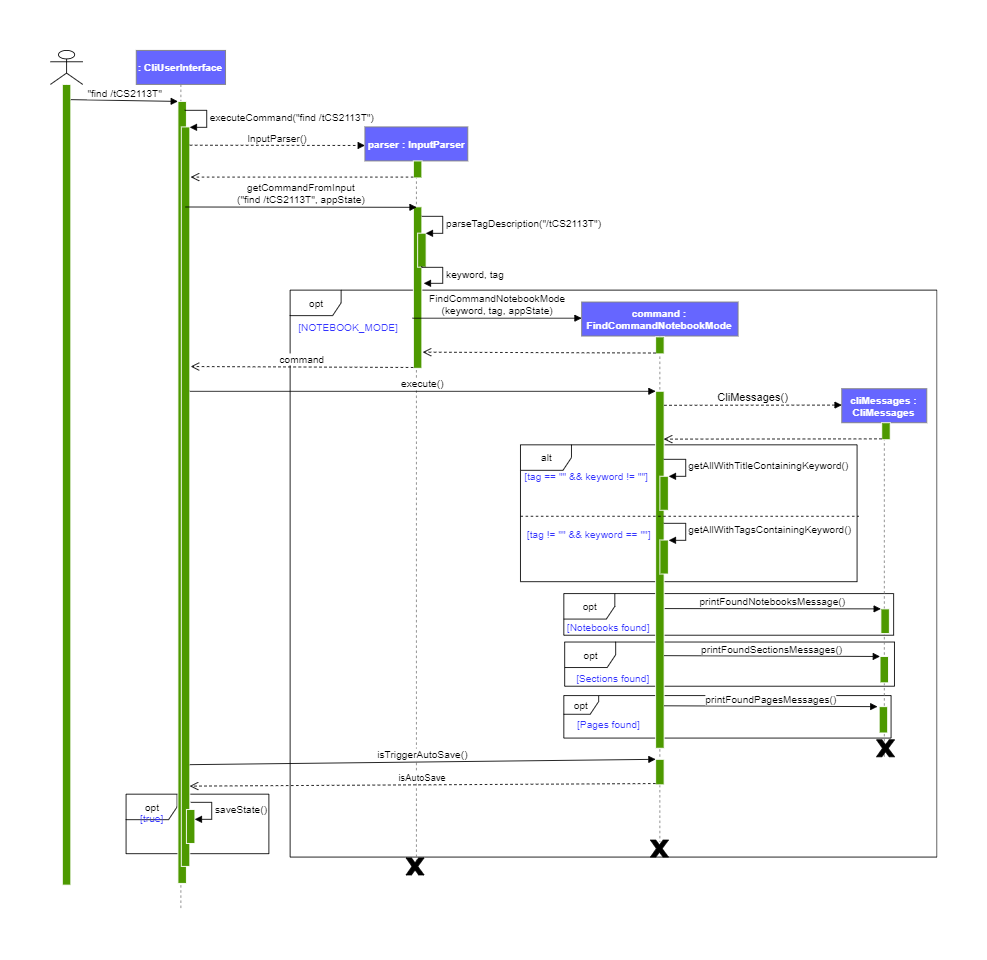 Figure [18]. Sequence diagram for Find Command in Notebook Mode
As the implementation of the search feature in the Notebook mode is similar to that in the Timetable mode, except:
- The
CliMessagesclass is constructed inFindCommandNotebookMode#execute()to display all the notebooks, sections and pages found.
Design Considerations
Aspect: Way to search through the notebook shelf
-
Alternative 1 (current choice): Loop through every page, section and notebook
- Pros: Able to trace the notebook and section that a found page belongs to. This makes it more convenient to show to the user.
- Cons: It is unoptimized in terms of complexity, with a complexity of O(n3).
-
Alternative 2: Store all notebooks, sections and pages into respective lists
- Pros: Has better time complexity of O(n) as it only needs to iterate through each list.
- Cons: Unable to output the notebook and section that a page belongs to the user
4.3.5. List Feature
Implementation
The following sequence diagram shows how the list operation in the notebook mode works:
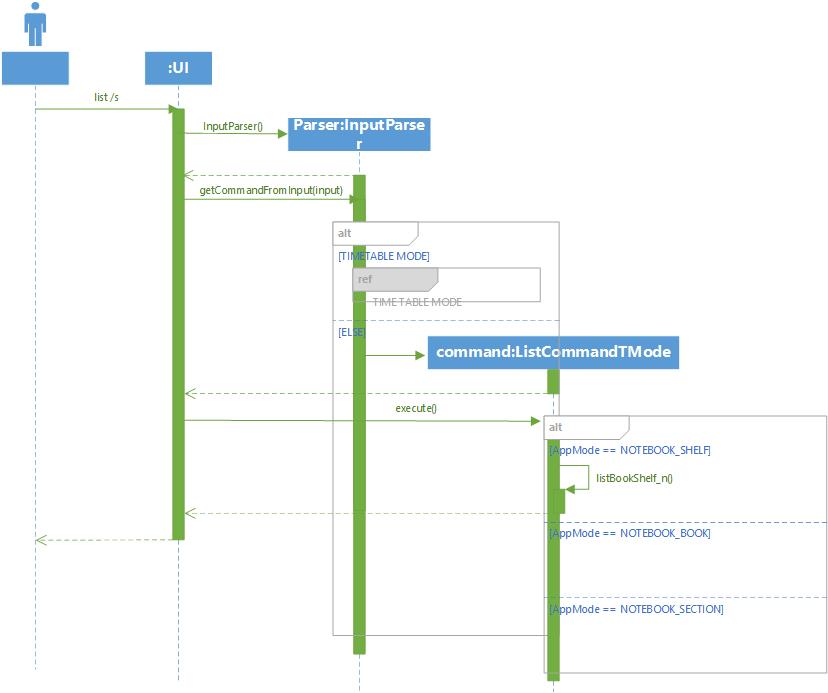 Figure [19]. Sequence diagram for List Command in Notebook Mode
Given below is an example usage scenario and how the list function behaves.
Step 1. The user types list /s. The list /s command is passed through
InputParser#getCommandFromInput, which constructs a ListCommandNoteMode object and calls
ListCommandNotebookMode#execute().
Step 2. execute() is called, which then calls the print functions based on the AppMode field in AppState.
Step 3. The program prints the contents corresponding to the input or throw an exception if the command is invalid.
4.4. Storage
The Storage class reads and writes the application state to and from a text file.
4.4.1. Storage format
This section describes the format used to store the TaskList and NotebookShelf from the application state in a plain text file.
![]() The operating system newline character is used to terminate lines; that is,
The operating system newline character is used to terminate lines; that is, \r\n on Windows and
\n on UNIX-based systems.
4.4.1.1. TaskList
For TaskList, the format is as follows:
- One line containing an integer
n, the number of tasks. -
3nlines follow, every 3 lines describing one task. - The first line contains the task title as a String.
- The second line contains the task due date, in the format
dd-MM-yyyy hhmm. - The third line contains a value
trueorfalse, indicating whether the task is done. (truemeans done,falsemeans not done.)
4.4.1.2. Page
For a single page, the format is as follows:
- One line containing the title of the page.
- One line containing the content of the page. Newline characters in the content are replaced with the string
"~~~".
4.4.1.3. Section
For a single section, the format is as follows:
- One line containing an integer
p, the number of pages in the section. -
ppages are then described, as specified here.
4.4.1.4. Notebook
For a single notebook, the format is as follows:
- One line containing an integer
s, the number of sections. -
ssections are then described, as specified here
4.4.1.5. NotebookShelf
For NotebookShelf, the format is as follows:
- One line containing an integer
n, the number of notebooks. -
nnotebooks are then described, as specified here.
4.4.2. Implementation
TaskList, Task,NotebookShelf, Notebook, Section, and page contain methods called serialize().
These methods returnString representations of themselves, as specified here.
The serialize() method in TaskList calls the serialize() methods for every Task object within
it and combines their outputs with a StringBuilder.
The serialize() method in NotebookShelf calls the serialize() methods for every Notebook object within it and
combines their outputs with a StringBuilder.
The serialize() method in Notebook calls the serialize() methods for every Section object within
it and combines their outputs with a StringBuilder.
The serialize() method in Section calls the serialize() methods for every Page object within it and
combines their outputs with a StringBuilder.
4.4.2.1. Saving the application state
The following sequence diagram describes the operation of the saveToFile() operation.
 Figure [20]. Sequence diagram for save application method
Note: The diagram above does not show how the saveToFile() method saves Task objects from the TaskList, in
the interest of brevity. The operation of the method is very similar for the TaskList, except the hierarchy is much
simpler for tasks (since Task objects do not contain other objects).
The Storage.saveToFile() method saves the current application state to a file.
It gets the NotebookShelf and TaskList objects from the current appState, passed in as a parameter. Then, as
described above in the sequence diagram, it iterates through the lists of Task objects in the TaskList and
Notebook objects in the NotebookShelf, calling their serialize() methods, which in turn call the
serialize() methods for each of their contained objects (if applicable). The saveToFile() method then uses
FileWriters to write to File objects, saving the serialized version of the application state to two text files.
4.4.2.2. Reading the application state
The following sequence diagram describes the operation of the readFromFile() operation.
The Storage.readFromFile() method creates an instance of AppState based on the contents of the saved text files, and
returns said instance of AppState if reading the save files was successful, and a blank instance otherwise.
readFromFile() uses Scanners, and the Scanner.nextLine() method to read the text files line by line. It parses
the lines containing integers indicating the number of notebooks/sections/pages/tasks, and subsequently uses for
loops to read the appropriate number of lines.
Each iteration of the loop creates a new instance of Task/Notebook/Section/Page as appropriate, using the
constructor to set the fields appropriately based on what is read from the save file, and then it adds the objects
to the appropriate container (i.e. adds each Task to the TaskList, adds each Page to its respective Section
etc. ). It then stores the loaded TaskList and NotebookShelf to a new instance of AppState and returns this.
4.5 Error Handling
The ZeroNoteException class extends Exception by printing an error message to the user when the user encounters an exception.
The following example is a scenario that demonstrates how exceptions are handled in Zer0Note.
-
The user launches the application for the first time.
CliUserInterface#executeCommandis called when the user types inhello. -
The
hellocommand is passed through a switch-case block withinInputParser#getCommandFromInput.Here is a small snippet of the switch-case block:
case ModeSwitch.COMMAND_WORD: return new ModeSwitch(argument, appState); default: throw new InvalidCommandException(userInput); -
As
hellois not a command inZer0Note,InvalidCommandExceptionwhich extendsZeroNoteExceptionwill be thrown. -
This
ZeroNoteExceptionis caught byCliUserInterface#run, which will then callZeroNoteException#printErrorMessage.
4.6 Personalised Messages
The PersonalisedMessageGenerator class prints out a personalised message to the users after particular commands
are executed successfully. A personal message is generated by randomising an encouraging message, and is printed
together with the name entered by the user upon launch of Zer0Note.
The following is an example of how the PersonalisedMessageGenerator class is used:
Assuming the user has input the username of ‘Tom’ into Zer0Note.
-
User adds a task with the given deadline.
-
execute()is called, where the boolean methodprintsPersonalisedMessage()in theCliCommandclass is called. -
printsPersonalisedMessage()returns a boolean variable of the namePRINTS_PERSONAL_MESSAGE, which determines whether a personalised message will be printed for the given command. -
printsPersonalisedMessage()returns true for theaddcommand, which calls thegeneratePersonalisedMessage()method inPersonalMessageGeneratorclass. -
generatePersonalisedMessage()returns a string which contains the random generated personal message to the user.
4.7. (Proposed) Save feature for the tagging function
The proposed save feature for the tagging function will be to save the user’s respective tags under both tasks and notebooks into the tasks.txt and notebooks.txt files in the same directory as the JAR file.
The save feature will be included in the Storage class as a saveTags() method, similar to the other save features (eg. saveTask() method).
This saveTags() method will be included under the saveToFile() method.
-
saveTags()will get the NotebookShelf and TaskList objects from the current appState, passed in as a parameter. -
After which, it iterates through the lists of
Taskobjects in theTaskListandNotebookobjects in theNotebookShelf, calling each of theirserialize()methods, which in turn calls theserialize()methods for each of their contained objects (if applicable). -
The
saveToFile()method then usesFileWriters to write toFileobjects, saving the serialized version of the application state to two text files.
5. Documentation
The following section describes how documentation for the project should be written. Note: documentation is all written in GitHub-Flavoured Markdown.
5.1. Setting up and maintaining the project website.
- We use Jekyll to manage documentation.
- The
docs/folder is used for documentation. - To learn how to set it up and maintain the project website, follow the guide [se-edu/guides] Using Jekyll for project documentation.
5.2. Style guidance
- Follow the Google developer documentation style guide.
- Also relevant is the [se-edu/guides] Markdown coding standard.
5.3. Diagrams
We use Microsoft Visio Professional 2019 to draw our UML diagrams. If you do not have access to this software, free alternatives such as Lucidchart, Google Drawings, LibreOffice Draw and many others are also available. If you wish to contribute diagrams (which we recommend you do if you contribute new features!), you may use any software of your choosing to draw the diagrams, as long as the finished product somewhat resembles those we already have and follows UML syntax strictly.
5.4. Converting a document to the PDF Format
We use Chrome for converting documentation to PDF format.
Reason: Chrome’s PDF engine preserves hyperlinks used in Web pages.
Here are the steps to convert the project documentation files to PDF format.
- Go to your generated documentation site on GitHub using Chrome.
- Within Chrome, click on the
Printoption in Chrome’s menu. - Set the destination to
Save as PDF, then clickSaveto save a copy of the file in PDF format. For best results, use the settings indicated in the screenshot below.
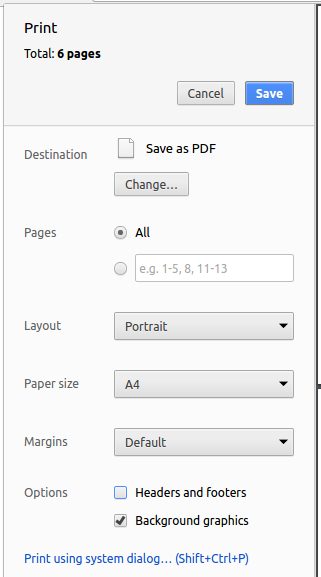
Figure [21]. Screenshot of Save as PDF settings
6. Testing
The following section describes the testing methodologies followed in this project to ensure high-quality, bug-free code as far as possible.
6.1. Running tests
There are two ways to run tests.
-
Method 1: Using IntelliJ JUnit test runner
- To run all tests, right-click on the
src/test/javaand chooseRun 'Tests in tp.test' - To run a subset of tests, you can right-click on a test package, test class, or a test and choose
Run 'ABC'.
- To run all tests, right-click on the
-
Method 2: Using Gradle
- Open a console and run the command
gradlew clean test(Mac/Linux:./gradlew clean test)
- Open a console and run the command
6.2. Types of tests
This project has one type of test:
Unit tests targeting the lowest level methods/classes.
e.g. teetwelvedashthree.zeronote.userinterface.command.notebook.AddNotebookTest
Appendix A: Project Scope
Target user profile
- student with multiple courses
- has a need to multiple notes
- has a need to view upcoming tasks swiftly
- prefer desktop apps over other forms
- is reasonably comfortable using CLI apps
Value proposition:
manage both tasks and notes faster and lighter than a typical mouse/GUI driven app
Appendix B: User Stories
Priorities: High (must have) - ***, Medium (nice to have) - **, Low (unlikely to have) - *
| Priority | As a … | I want to … | So that I can … |
|---|---|---|---|
*** |
user | record and save my notes | review them later |
*** |
student | view all tasks and sections of my notebook | have a clear view of my progress |
*** |
new user | have usage instructions | refer to instructions when I forget how to use the App |
** |
forgetful user | see the most urgent tasks | prioritise my tasks |
* |
long-time user | have personalised messages | feel attached to my notes |
Appendix C: Use Cases
(For all use cases below, the System is the Zer0Note and the Actor is the user, unless specified otherwise)
Use case: Add task
- User requests to add a task
- Zer0Note adds the task to the list
- Zer0Note displays a personalised message to the user.
Extensions
- 1.1 The user did not enter a deadline.
- 1.1.1 Zer0Note shows an error message Use case ends
- 1.2 The user did not enter a title.
- 1.1.1 Zer0Note shows an error message Use case ends
- 1.3 The user entered an incorrectly formatted deadline.
- 1.1.1 Zer0Note shows an error message Use case ends
- 1.4 The user missed one or more arguments.
- 1.1.1 Zer0Note shows an error message Use case ends
Use case: Delete task
- User requests to list tasks
- Zer0Note shows a list of tasks
- User requests to delete a specific task in the list
- Zer0Note deletes the task
Use case ends.
Extensions
- 2.1. The task list is empty.
Use case ends. - 3.1. The given index is invalid.
- 3.1.1. Zer0Note shows an error message.
Use case resumes at step 2.
- 3.1.1. Zer0Note shows an error message.
Use case: Find task
- User tries to find a task with a given string in the title
- Zer0Note prints a list of tasks with titles matching that string
- Zer0Note prints a personalised message Use case ends
Extensions
- 1.1 The task list is empty
- 1.1.1 Zer0Note displays an error message stating the task list is empty.
- Use case ends
- 1.2 There is a syntax error
- 1.2.1 Zer0Note displays an error message
- Use case ends
Use case: List notebooks
- User wants to list the notebooks/sections/pages in the current location.
- Zer0Note lists all the notebooks/sections/pages in the current location.
- Zer0Note prints a personalised message.
Use case: Add tags and find by tags
- User requests to list tasks
- Zer0Note shows a list of tasks
- User requests to add a tag to a task in the list
- Zer0Note adds the tag to the chosen task
- User requests to add the same tag to another task in the list
- Zer0Note adds the tag to the chosen task
- User requests list tasks with the tag used above
- Zer0Note lists out the tasks with the specified tag Use case ends.
Appendix D: Non-Functional Requirements
- Should work on any mainstream OS as long as it has Java
11or above installed. - Should be able to hold up to 1000 persons without a noticeable sluggishness in performance for typical usage.
- A user with above average typing speed for regular English text (i.e. not code, not system admin commands) should be able to accomplish most of the tasks faster using commands than using the mouse.
Appendix E: Glossary
- Mainstream OS: Windows, Linux, macOS
- Notebook shelf: a list of all notebooks entered by the user
Appendix F: Instructions for manual testing
Given below are instructions to test the app manually.
Note: These instructions only provide a starting point for testers to work on; testers are expected to do more exploratory testing.
1. Launch and Shutdown
1.1. Initial launch
i. Download the jar file and copy into an empty folder.
ii. Double-click the jar file
Expected: Command Line Interface should launch with a welcome message from Zer0Note as shown below:
Welcome to
 _ _ _                  _ _ _   _    _            _
|_ _  |   _ _    _  _  |  _  | |  \ | |   _ _   _| |_    _ _
  /  /  /  _  \ | |/_\ | | | | |   \| |  /   \ |_   _| /   _ \
 /  /_  |  _ _/ | |    | |_| | |  |\  | |  [] |  | |_  |  _ _/
|_ _ _|  \ _ _| |_|    |_ _ _| | _| \_|  \ _ /   |_ _|  \ _ _|
You are now in timetable mode
2. Test Cases
2.1. Deleting a task
2.1.1. Deleting a task while all tasks in the existing tasklist is listed.
i. Prerequisites: User must be in the Timetable mode. Enter mode /t command to enter Timetable mode. List all tasks in the tasklist using the list command. There must be existing tasks in the list.
ii. Test case: delete 1
Expected: First task is deleted from the tasklist.
iii. Test case: delete 0
Expected: No task is deleted. Error message will be printed in the command line interface.
iv. Other incorrect delete commands to try: delete, delete x (where x is larger than the number of tasks in the tasklist)
Expected: No task is deleted. Error message will be printed in the command line interface.
2.2. Adding a task
2.2.1 Adding a task to the tasklist.
i. Prerequisites: User must be in the Timetable mode. Enter mode /t command to enter Timetable mode.
ii. Test case: add /t test task /by 10-10-2020 2000
Expected: Task is added into the tasklist with a success message printed.
iii. Test case: add /t test task
Expected: An error message will be printed in the command line interface.
iv. Test case: add
Expected: An error message along with a formatting guideline message will be printed.
v. Test case: add /t test task /by 2020-10-10 2000
Expected: An error message along with a formatting guideline message (date format should be dd-MM-yyyy HHmm) will be printed in the command line interface.
2.3. Marking a task as done
2.3.1 Marking a task as done while there are existing task in the tasklist.
i. Prerequisites: User must be in the Timetable mode. Enter mode /t command to enter Timetable mode. List all tasks in the tasklist using the list command. There must be existing tasks in the list.
ii. Test case: done 1
Expected: First task should be marked as done in the tasklist.
iii. Test case: done 0
Expected: An error message along with a formatting guideline message will be printed in the command line interface.
iv. Other incorrect done commands to try: done, done x (where x is larger than the number of tasks in the tasklist)
Expected: An error message along with a formatting guideline message will be printed in the command line interface.
2.4. Tagging a Task
2.4.1. Tagging an existing task in the tasklist.
i. Prerequisites: User must be in the Timetable mode. Enter mode /t command to enter Timetable mode. List all tasks in the tasklist using the list command. There must be existing tasks in the list.
ii. Test case: tag 1 /tschoolWork
Expected: Task in index 1 of the tasklist is tagged with a tag ‘schoolWork’.
iii. Test case: tag 1
Expected: An error message along with a formatting guideline message will be printed in the command line interface.
iv. Test case: tag
Expected: An error message along with a formatting guideline message will be printed in the command line interface.
v. Test case: tag schoolWork
Expected: An error message along with a formatting guideline message will be printed in the command line interface.
2.5. Listing a Task
2.5.1. Listing existing task in the tasklist.
i. Prerequisites: User must be in the Timetable mode. Enter mode /t command to enter Timetable mode. There must be existing tasks in the list.
2.5.1.1. Listing all existing task in the tasklist.
i. Test case: list
Expected: All existing tasks in the tasklist will be printed out.
2.5.1.2. Listing all marked as done existing tasks in the tasklist.
i. Test case: list /d
Expected: All existing marked as done tasks in the tasklist will be printed out.
2.5.1.3. Listing all undone existing tasks in the tasklist.
i. Test case: list /u
Expected: All existing undone tasks in the tasklist will be printed out.
2.5.1.4. Listing all urgent existing tasks in the tasklist.
i. Test case: list /urgent
Expected: All existing urgent tasks in the tasklist will be printed out.
2.6. Executing a mode switch
2.6.1. Switching between Timetable mode and Notebook mode.
i. Prerequisites: User must be in the Timetable mode. Enter mode /t command to enter Timetable mode.
ii. Test case: mode /n
Expected: Mode is switched to Notebook mode.
iii. Test case: mode /t
Expected: Mode is switched to Timetable mode.
iv. Test case: mode
Expected: An error message along with a formatting guideline message (missing follow up command ‘/n’ or ‘/t’) will be printed in the command line interface.
2.7. Finding a Task using a keyword
2.7.1. Finding all tasks that contains a specified keyword.
i. Prerequisites: User must be in the Timetable mode. Enter mode /t command to enter Timetable mode. List all tasks in the tasklist using the list command. There must be existing tasks in the list.
ii. Test case: find Project
Expected: All tasks with tags that contains the word ‘Project’ will be printed. If the tasks do not have tags, it will list the tasks with titles that contain the keyword ‘Project’.
iii. Test case: find
Expected: An error message along with a formatting guideline message will be printed in the command line interface.
2.8. Adding a Notebook/Section/Page
2.8.1. Adding a respective notebook/section/page in their respective list.
i. Prerequisites: User must be in the Notebook mode. Enter mode /n command to enter Notebook mode.
2.8.1.1. Adding a Notebook.
i. Prerequisites: User must not be in a selected notebook or section. User should type mode /n before executing this test case.
ii. Test case: add /nCS2113T
Expected: Notebook ‘CS2113T’ is added to the notebookShelf with a success message printed.
2.8.1.2. Adding a Section.
i. Prerequisites: User must select a notebook. Enter select /n[NOTEBOOK] to enter a specified notebook.
ii. Test case: add /sChapter 1
Expected: Section ‘Chapter 1’ is added to the specified notebook with a success message printed.
2.8.1.3. Adding a Page.
i. Prerequisites: User must select a Section. Enter select /s[SECTION] to enter a specified section.
ii. Test case: add /pPage 1 ; a test page
Expected: Page ‘Page 1’ along with content ‘a test page’ is added to the specified section with a success message printed.
2.9. Selecting a Notebook/Section/Page
2.9.1. Selecting a respective notebook/section/page in their respective list.
i. Prerequisites: User must be in the Notebook mode. Enter mode /n command to enter Notebook mode.
2.9.1.1. Selecting a Notebook.
i. Test case: select /nCS2113T
Expected: The user will enter the selected notebook ‘CS2113T’ with a success message printed.
2.9.1.2. Selecting a Section.
i. Test case: select /sChapter 1
Expected: The user will enter the selected Section ‘Chapter 1’ with a success message printed.
2.9.1.3. Selecting a Page.
i. Test case: select /pPage 1
Expected: The user will enter the selected Page ‘Page 1’ with a success message printed.
ii. Test case: select /nCS2113T /sChapter 1 /pPage 1
Expected: The user will enter the selected Page ‘Page 1’ with a success message printed.
2.10. Deleting a Notebook/Section/Page
2.10.1. Deleting a respective notebook/section/page in their respective list.
i. Prerequisites: User must be in the Notebook mode. Enter mode /n command to enter Notebook mode. There must be existing notebooks/sections/pages in the respective list when command list is entered.
2.10.1.1. Deleting a notebook.
i. Test case: delete /nCS2113T
Expected: The selected notebook ‘CS2113T’ will be deleted, along with the sections and pages under it, with a success message printed.
2.10.1.2. Deleting a section.
i. Test case: delete /sChapter 1
Expected: The selected section ‘Chapter 1’ will be deleted, along with the pages under it, with a success message printed.
2.10.1.3. Deleting a notebook.
i. Test case: delete /pPage 1
Expected: The selected page ‘Page 1’ will be deleted with a success message printed.
2.11. Listing a Notebook/Section/Page
2.11.1 Listing existing notebook/section/page in the NotebookShelf.
i. Prerequisites: User must be in the Notebook mode. Enter mode /n command to enter Notebook mode. There must be existing notebooks/sections/pages in the respective list when command list is entered.
ii. Test case: list
Expected: All existing Notebooks/Sections/Pages will be listed in the given NotebookShelf/Notebook/Section respectively.
2.11.1.1. Listing all n task in the tasklist.
i. Test case: list /a
Expected: All notebooks, sections and pages will be printed out.
2.11.1.2. Listing the list of notebooks and their sections
i. Prerequisites: User must be in a notebook and not in a section.
ii. Test case: list /s
Expected: All notebooks, and their respective sections will be printed out.
2.12. Tagging a Notebook/Section/Page
2.12.1. Tagging an existing notebook/section/page in the list.
i. Prerequisites: User must be in the Notebook mode. Enter mode /n command to enter Notebook mode. List all tasks in the tasklist using the list command. There must be existing tasks in the list.
ii. Test case: tag /tschoolWork
Expected: Specified name of notebook/section/page in the list is tagged with a tag ‘schoolWork’.
iii. Test case: tag
Expected: An error message along with a formatting guideline message will be printed in the command line interface.
2.13. Finding a Notebook/Section/Page using a keyword
2.13.1. Finding all notebooks/sections/pages that contains a specified keyword.
i. Prerequisites: User must be in the Notebook mode. Enter mode /n command to enter Notebook mode. List all notebooks/sections/pages in the notebookShelf using the list /a command. There must be existing notebooks/sections/pages in the list.
ii. Test case: find Project
Expected: All notebooks/sections/pages with tags that contains the word ‘Project’ will be printed. If the notebooks/sections/pages do not have tags, it will list the notebooks/sections/pages with titles that contain the keyword ‘Project’.
iii. Test case: find
Expected: An error message along with a formatting guideline message will be printed in the command line interface.
3. Saving Data
3.1. Dealing with corrupted data files
i. Click on the folder that the jar file had been saved in.
ii. Select all the ‘tasks.txt’, ‘notebooks.txt’ and ‘nameOfUser.txt’ files.
iii. Delete all the files.
iv. Restart the application by double-clicking the jar file and running Zer0Note.
Expected: The Command Line Interface should launch with a welcome note from Zer0Note as shown in Appendix F, 1.1.
3.2. Dealing with corrupted name file
i. Click on the folder that the jar file had been saved in.
ii. Select the ‘nameOfUser.txt’ file.
iii. Delete the file named ‘nameOfUser.txt’
iv. Restart the application by double-clicking the jar file. Re-enter the name of user.
Expected: The Command Line Interface should launch with a welcome note from Zer0Note as shown in Appendix F, 1.1.
3.3. Changing of saved name
i. Click on the folder that the jar file had been saved in.
ii. Double-click the ‘nameOfUser.txt’ file to edit it.
iii. Change the name in the txt file with the desired name and save the file.
iv. Re-run Zer0Note with the desired name.
Expected: The Command Line Interface should launch with a welcome note from Zer0Note with the desired name that was entered
in the nameOfUser.txt file.